Friday, December 2, 2011

Snow Angel - Frosty Kisses

Today I made a card using the Cricut Snow Angel cartridge.  I did the little girl snowman (snowgirl?) probably at 3 to 3 1/2 inches.  She's mounted on pink card stock, on a white card.  I used a wiggly eye, some gold gems for the buttons, and a pearl for her hat.  I added a little bit of stickles diamond for some frost on the hat and lettering. 


The wording comes from Cricut's Winter Woodland cartridge. Thanks, have a good day and a great weekend!

Thursday, November 24, 2011

Lori's Garden - Peace

I love these birds from Lori's Garden, in fact I thought they looked dove-like for Christmas, so I made a Christmas card out of one.  The Peace is from Winter Woodland. 

I blinged it up a little with a pink gem for it's eye, and some gold stickles along the wings and on the tail.  To give it dimension I lifted the head and bottom wing with clear pop dots.
Thanks for stopping by, hope everyone had a happy Thanksgiving!

Saturday, November 5, 2011

Lori's Garden - Love You

I made this card with Lori's Garden....did I say I love it yet......I made the center strip with doily lace stamp and a ribbon going down the middle.  I added the Love You in center after blinging it up a bit with gold stickles in the center of the flowers.  The butterfly is 2 layers, the wings being lifted with glue dots, it also has some gold stickles to accent it's wings, and a blue gem for it's eye.
Thanks for stopping by and have a great weekend!

Wednesday, November 2, 2011

Lori's Garden - Thank You

Hello everybody.  I got a lacy edge trimmer (doily lace by Martha Stewart), and made a couple of cards using Lori's Garden cartridge for the Cricut Imagine--Love it!


I had a little trouble making the thank you tag to stick because part is on the ribbon.  I ended up using medium clear pop dots (Elmers craft bond) which gave it a really good lift, and it stays stuck!  The wings on the big butterfly are raised using the same pop dots on the bottom layer and thinner ones, also Elmers craft bond, on the top layer.  I used gold stickles to add bling to the butterflies!  Thanks for stopping by, have a blessed day!

Monday, September 26, 2011

Enjoy the Seasons - Give Thanks

Happy Monday everybody.  I made a card using Enjoy the Seasons cartridge for Thanksgiving.   Sometimes I envision the way I want to make a card, and when I start putting it together it doesn't look so hot.  I wanted to use the fall tree for the background on this, but it was all too wild.  So here's what I ended up with:


I used stardust Stickles to outline the stems and lines of the squash and pumpkins, and a little red pearl for the hedgehog's eye!  Thanks for stopping by :)

Monday, September 19, 2011

Lori's Garden - Swinging Bird

Hello, I made a little card using Lori's Garden.  I used the little bird on a swing along with a branch and some flowers I had left over.  I used glue dots to raise the layers just a little (there are 3 or 4 layers) 


The background paper had glittery flowers,  I used some Bliss Mist on the bird for a little bling, clear gem for the birds eye and red pearl beads for the centers of the flowers.  It doesn't have a sentiment, yet.  Thanks, have a marvelous day!

Saturday, September 17, 2011

Lori's Garden - Flowers and Bird

I guess we're going fishing tomorrow, so I have time to post another inspirational card I made using Lori's Garden.  I''m loving that cartridge!


I blinged it up with a clear gem for the birds eye, some glitter around the bird and the flowers along with pearls in the centers.  The flowers have 3 layers (they would have 5 or 6 if I used them all), I used glue dots to add a little dimension.  I also used glue dots and doubled them under the birds head and wing to make it look like it was flying.  Thanks for stopping by, and have a blessed day!

Friday, September 16, 2011

Lori's Garden - Butterfly and Rose

We're supposed to go fishing tomorrow, so I wanted to post my next card today.  It's made from Lori's Garden, a beautiful cart full of flowers, birds and butterflies.  You're probably going to see a lot more of it.  I also wanted to make some inspirational cards, so here is the first of hopefully many more:


It says " .. the earth is filled with the lovingkindness of the Lord Psalm 33:5.  I really wanted to bling it up, so I sprayed the flower and butterfly with Bliss Mist, added glitter to the butterfly, and put pearls in the center of the rose and the little flowers around it.  It is this time of the year I do feel the lovingkindness of our Lord.  He must really have an eye for beauty, just look at all the colors!  Have a great day!

Enjoy the Seasons - Fall Squirrel

Hello, and Happy Friday.  It seems like it's been forever since I've made anything, or blogged.  I've been working on cleaning all my card mess out of the dining room and putting them in my unused craft room.  I've cleaned out stuff I didn't think I would use, and found a small kitchen table (my sons) I could put in the room.  After all that, I don't like it.  It feels too isolated and the table is too small :(  .  Crafting sure takes a lot of room.  But I have my dining room back :)


I thought it would be nice to combine the fall leaves and the squirrel stump on the Enjoy the Seasons cartridge.  However, after printing and cutting, the fall leaves looked kind of faded.  So I used these leaves I bought on sale some time ago.  I also added a googlie eye to the squirrel! Thanks for looking.

Tuesday, August 2, 2011

Better Together - Best Friends

Sorry I haven't posted for a while, I was out of state helping my parents move.....what a week!
I made a friendship card, simple, but I really liked the little girl with her dog.  I'm not really sure the dog hug would be taken, the receiver might think the giver thinks of them as a dog???, or a compliment, we are awful fond of our doggies!!!


The card is very dark brown, with a creamy layer, and a bow :) . I used the small glue dots again, lifting the girl's body two layers and her head three layers deep.  There is a little bit of glitter in the centers of the flowers too!
Thanks for stopping by

Tuesday, July 19, 2011

JT - Fishing

I was thinking about this project and wanted to use the JT fish for my hubby's fishing picture.  I saw a challenge at My Pink Stamper and decided to make this page for the challenge. The winner can be on their design team-sounds like a blast!  We are supposed to:
 
Make a card, scrapbook page, or other Cricut project with your favorite Cricut cartridge using the following colors......
Orange
Turquoise 
Green
Brown
(other optional color of your choice)
 
My optional color is blue.
I made this layout using the JT cartridge for the imagine and the text is made with Gypsy Font, colored with a pattern from the JT cart.  
The fish are almost 4 inches, I split them and copied them and fit to page to make 2 complete layered fish on an 8.5 X 11 sheet of white paper.  I sprayed them with Bliss Mist to give them a nice shiny glow.  Aren't those fish funny?
I made the "waves" out of the border in the JT cart.  I printed two at one inch, and two more turquoise on the cut only setting.


I never would have thought to use orange and brown on my layout except for the challenge, but I think those colors really set off my pictures, so if I don't win the challenge, I'm a winner already!  Have a great day!

JT - Fly

I made a Fly card from the JT cartridge, because I really like the bird!  And I even got some ribbon on it!!!
Have a nice day

Monday, July 18, 2011

JT - Dragon

I didn't think I was real thrilled with the dragon in the JT cartridge, but I had made this background paper, mixing light brown and light pink distress inks.  Then I sprayed the whole thing with whipped honey butter Bliss Mist, giving the whole thing a gold shimmer and sparkles.  It works wonderfully with the dragon!  I added some Stickles along some of the edges of the dragon.

And alas, I couldn't work the ribbon in :(  Thanks for looking!

Stretch Your Imagination - Wedding Card

As promised here is the other card I made, but didn't use.  I really liked the way it turned out, but not as much as the one I used.

It doesn't show, but the whole card is shiny and sparkley, I used little rhinestones for the buttons on the dress, and of course I got my ribbon and a flower in there :) .

Thursday, July 14, 2011

Stretch Your Imagination - Wedding Card

My brother-in-law is getting married this weekend, so I made his wedding card using Stretch Your Imagination cartridge and the Imagine machine.  I used the stretched wedding card and the stretched couple for the envelope.  I had a cream 5 X 7 envelope, so I made the card 7" tall, it's not 5" wide, but it seemed best to fit to the tall length and not the width length.  I used the imagine machine to print the frame, I think it's the imagine more cartridge.  The love was from the Cricut Sampler cartridge.  I added ribbon, flowers, and put little pearls down the front of the bride for buttons.


I made another wedding card using the little bride and groom, but will have to post it after the wedding, I just wanted to post this before I write on it :).  Have a great day!

Tuesday, July 5, 2011

Imagine More - Mem-moo-ries

I made a happy little cow card using Imagine More cartridge, it says Mem-moo-ries (I'm not too sure if that's clear in the picture)  It's pretty simple, but I think it turned out cute.  Our 30th anniversary is coming up in September, I'm thinking we have lots of mem-moo-ries.  Somebody will probably get this card for our anniversary :)
 
I added wiggley eyes, and pop dots to lift the head a little, and it's red, white and blue for the 4th of July!  Have a good one!

Saturday, July 2, 2011

Better Together - You're My Cup of Tea

Here's a quick card I did with Better Together cartridge.  It's just the cup made at about 3 inches and the word art 1.5 inches, I put them on with glue dots, which raises them up a little, but not as much as a pop dot.


Have a great day and a Happy 4th of July, and thanks so much to all our service men who have given up so much for us.  May you truly be blessed!

Thursday, June 30, 2011

Imagine More - Owls

I was having a little problem cutting owls, so there were a lot of them, and since we were camping and had a lot of time hand cut a lot of the parts...so here are some owl cards.


I made the second one after I got home, and it has ribbon!!!!  But I kind of like the first one, I like the little guy standing in the flowers.  Hummm, maybe I should add some glitter glue in the centers of the flowers.

Tuesday, June 28, 2011

Imagine More - Parrot

I made this parrot card while camping.  I think it turned out nice, but I really had it in my mind to put on green paper instead of cream (which doesn't show up very well),  I accidentally put something else on my green card and didn't have any more. 


So when I got back I made another one on green paper, and of course I had to work my ribbon and bow in.  I put brads in the flowers for the middle and mounted them with glue dots so the brads didn't have to go through the card.
I'll have more in a day or two!

Sunday, June 26, 2011

Create A Critter

Sorry it's been a while since I've posted new cards, I've been camping last week.  While I was gone I made some cards with the imagine machine.  I had printed and cut some stuff from Better Together cartridge then put them together at the lake.  Those will be coming soon because I haven't had a chance to photograph them yet.  For now here are some cards I made with Create A Critter cartridge.


While I was at the lake I got some pictures of the Duckett fire burning near Westcliffe, some great sunset pictures, and an antelope.  Just click on my flicker link at the bottom of the page to see them! Have a great weekend!

Sunday, June 19, 2011

Review Cricut Imagine

I've had a week or two to play with my new Cricut Imagine machine.  I really like being able to print and cut at the same time.  The layouts on the imagine cartridges are cute and can be split into different layers and re-sized which is very cool.  You can print and cut the layers and use pop dots between them to give some dimension to your layouts.

Being a scrap booker (both regular and digital), card maker, and photographer I thought it would be really cool to be able to print and cut a photo or a photo with a border around it, or make a card and type my own sentiment in it.  You can't do that.  It will print sentiments if you have them on one of your cartridges, either imagine or regular.  You can change the color or use a color/pattern from an imagine cartridge.  It seems like you should be able to print from your computer just like a regular printer and cut.

Another thing I find very aggravating is the way it cuts your layouts.  It doesn't let you move things around on the mat even with gypsy like you can with a personal cricut or cricut expression, so it tends to waste a lot of paper.  I spend a lot of time trying to put big things on one line all the way across and little things on the next line all the way across.

Also, the mats aren't sticky enough.  You can't use the mats on the imagine like you can the other cutters placing different colored pieces of papers in different spots.  It just isn't sticky enough. 

I hope Provo Craft fixes some of these things.  It seems like they cripple an expensive machine that could be very cool if it had the proper software and/or drivers.  It ought to be able to be used for so much more. 

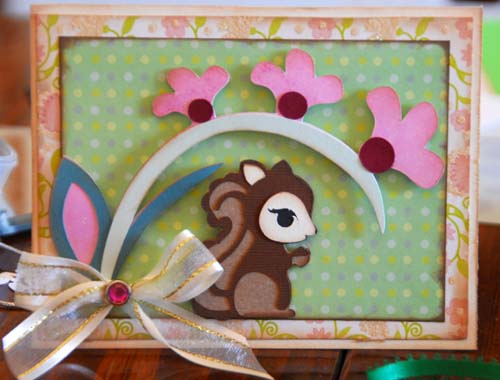
That being said here are some things made with it using Imagine More cartridge.

For my dad for Father's Day-I didn't have a Happy Father's day stamp.

I used glitter glue for the center of the flowers and used pop dots to lift the bottom of the wing. . . It's a prettier than the picture shows
No sentiment yet, I raised the butterfly wings with pop dots and curled them under, I also raised the bird except I did glue the legs down.  I could see them bending and curling if I had just left them.  I also used glitter glue on the butterfly spots and birds eyes.
Does anyone else have any Imagine comments, or feel the same?

I made some book markers too, but I can't find where I saved them.  Will post as soon as I find them :{   Have a nice day and a happy Father's Day!

Saturday, June 18, 2011

Paper Doll Dress Up - Wagons West

I have three cards today. There was a challenge to make a man's birthday card and it had to be something with wheels.  I decided to make a wagon, and I made three different ones to see which one I liked best.  I didn't get them done in time for the challenge, but here they are.  My favorite is the last one, maybe the second one.  I used the accessory setting on Paper Doll Dress up for the wagon.


Thanks for stopping by, have a great day!

Wednesday, June 8, 2011

Hoppy Birthday - Animal Kingdom

Since I haven't posted for a long time I thought I'd do two cards today.  I haven't posted this card because I'm going to give it to my daughter for her birthday (she really likes frogs).  I used several cartridges for this layout, the frog from Animal Kingdom, The mushroom is from Cindy Loo.  The sentiment "Hoppy Birthday" was made from Gypsy Font and Old West. The frog is on pop dots and has little jewel eyes.


Happy Birthday Angie, Have a nice day!

Monkeying Around - Create A Critter

Here's a card I made with the monkey in Create A Critter,  I cut two of the curved vines for the top, assembled the monkey and banana and placed them so the monkey looks like it's swinging.  It has no sentiment yet!

Wednesday, May 18, 2011

Sentimentals - Owl Card

This is another background made from "Linen Closet" matstock...I used the owl from the Sentimentals cartridge.  I used bright blue jewels for the eyes and I thought it would be nice to put 'just a note' on the envelope the owl is carrying, it might be better if I had a stamp.

I might work on that.

Tuesday, May 17, 2011

Sentimentals - Metallic Silver Butterfly

I really liked the way this card turned out.  I've left a space on the top for a sentiment.  I'm thinking it could be about anything from a happy birthday, thinking about you, a really nice one for sympathy.  The card's background is made from "Linen Closet" Matstack by DCWV.  I love the soft glittery colors.

The butterfly is made from black paper on the bottom and metallic silver on the top, from the Sentimentals cartridge.

Sunday, May 15, 2011

Gypsy Wanderings - Owl

This card was made by putting two owl backgrounds together with the gypsy.  I cut the top layer out in a flowered paper and added a bow with a brad and some google eyes.


It says "You're a hoot" inside!

Saturday, May 14, 2011

Sentimentals - Bee Card

Here is a little bee card I made from the Sentimentals cartridge, I welded two shadows together at an angle to make the fold on both sides of the wing.  It's 5.5 in long to fit in an invitation envelope.To finish it off I put a little gold bow on it's neck and gold studs for it's eyes.

Don't worry, bee happy-have a great day :)

Friday, May 13, 2011

Gypsy Wanderings - For You

Just a simple card using the flower and "for you" in Gypsy Wanderings.

I used a jeweled brad for the center of the flower!

Just Because Cards - A Little Pickup

I love this little pick up, and what a great card for a friend that is feeling low.  I really didn't do much except cut out all the parts and put them together!

Monday, May 9, 2011

Paper Doll Dress Up - Clam Card

I made a clam card from Paper Doll Dress Up cartridge.  I welded two clam shadows together at the bottom for the clam card/insides in pale aqua so it would look like it was under water.  Then I used an iridescent pearl white paper for the clam outside card.


I thought it was appropriate for my turtle to hold it up for photographing!


When you open it up there are some little fishes and a mermaid holding a pearl.  So far it has no sentiment!

Friday, May 6, 2011

Paper Doll Dress Up - Birthday Wishes

Here's my first card from Paper Doll Dress up.  A genie coming out of a lamp made of shiny gold paper-- to give you birthday wishes.  I made the smoke out of velum, one piece behind her and one in front of her. If I had it to do over again I would make 2 lamps and glue them together to make the lamp stronger.

I wish you have a good day!

Tuesday, May 3, 2011

Animal Kingdom - Pepe Le Pu

Somebody is going to get this for valentines day next year! Made with Animal Kingdom cartridge, Pepe is sniffing a flower-made with a silk flower held in with a brad-and is in a rather amorous mood as evidenced by the crystal hearts :)


It snowed yesterday, so I was in the mood to make Christmas Cards-no time like the present to get started.  And I got my Paper Doll Dress Up cartridge today.  I've already got some great ideas so stay tuned!

Sunday, May 1, 2011

Animal Kingdom - Brown Chicken Brown Cow

After posting my Chicken Bacon Ranch card it struck me that I needed to make a Brown Chicken Brown Cow card, so here it is.  It was hard to find so many different brown papers, and whoever "herd" of a poka-dot cow.  Good thing we can have some fun  with that kind of stuff!  I'm thinking I might have to give it to my daughter for her birthday :) hope she doesn't see this!!  The cow was made in Animal Kingdom and the chicken from Country Life.  Have a good day.  It's snowing like crazy here, but we really, really, needed it.

Saturday, April 30, 2011

Just Because Cards - Cowboy Boot

My version of the widely used cowboy boot in Just Because Cards!

Friday, April 29, 2011

Cindy Loo - Squirrel Card

I made this squirrel 5.5 in. by 4.25 in. card from the Cindy Loo cartridge.  I made the flower at 4 inches and the squirrel at 2 inches.  I had to cut the stem off the flower or it would be in the squirrel's way, then I put the bow in with a brad.